Using the Find box
Updated for Logos 8+
Page Contents
What is the Find box?
In most of your resources you can open a Find box. The Find box is a small bar which drops down just below that resource’s toolbar.

In the Find box, type a word and Logos will search for that word in your resource, starting where-ever you are in the resource and going forward. If no occurrence of your word (or partial word) is found you may notice that the box turns red. This quickly helps you determine if your word is present.
Once your word is found you can use the Up/Down arrows to move to the previous or next occurrence of your word. It is similar to Find in your browser or other software tools.
The Find box is not meant to replace the Search tool. It’s best purpose is to help you locate words which might be close to where are reading in the resource. And it can be used to find punctuation, unlike the Search tool.
There is a Find/Search box in Notes and Clippings, but it works differently in those tools and you should consult their documentation at Notes and Clippings.
How to Open & Use a Find box in a resource
The following steps work in most of your resources: Bibles, Commentaries, Dictionaries, and other books.
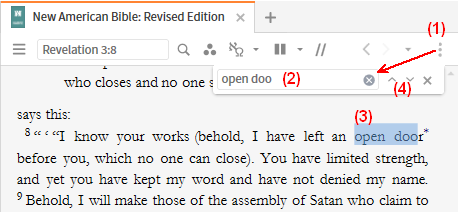
- Click on the Panel menu and select Find (in this panel)
- Or you can use the keyboard shortcut Ctrl+F/Cmd+F

- In the Find box start typing the word/phrase which you want to locate.
- As you start typing Logos will highlight the text in the resource.
Notice that you may not need to type the whole word. - Click on the Down arrow (or Up arrow) to locate another occurrence of your word.
- Logos will move to that occurrence and highlight it.
- If you type a word (or mistype) which is not found, Logos will shade the Find box red. This helps you check your spelling or change the word.
- Click on the blue circle with the x to clear the content of the Find box.
- When you are done using the Find box you can close it by clicking on the X to the right of the Find box.